Deploy and call a contract in GUI
After finishing writing and testing of a contract, it is recommended to deploy it to testnet to verify the contract is correct and the enclosing transaction can be accepted by the network. IDE provides a GUI, where you can deploy a contract with just one click after filling in the relevant inputs. You can call the public function of the deployed contract with just another click, without writing a single line of code.
The GUI mainly includes:
sCrypt button (sCrypt Deploy). Click to switch from other side view to deployment view
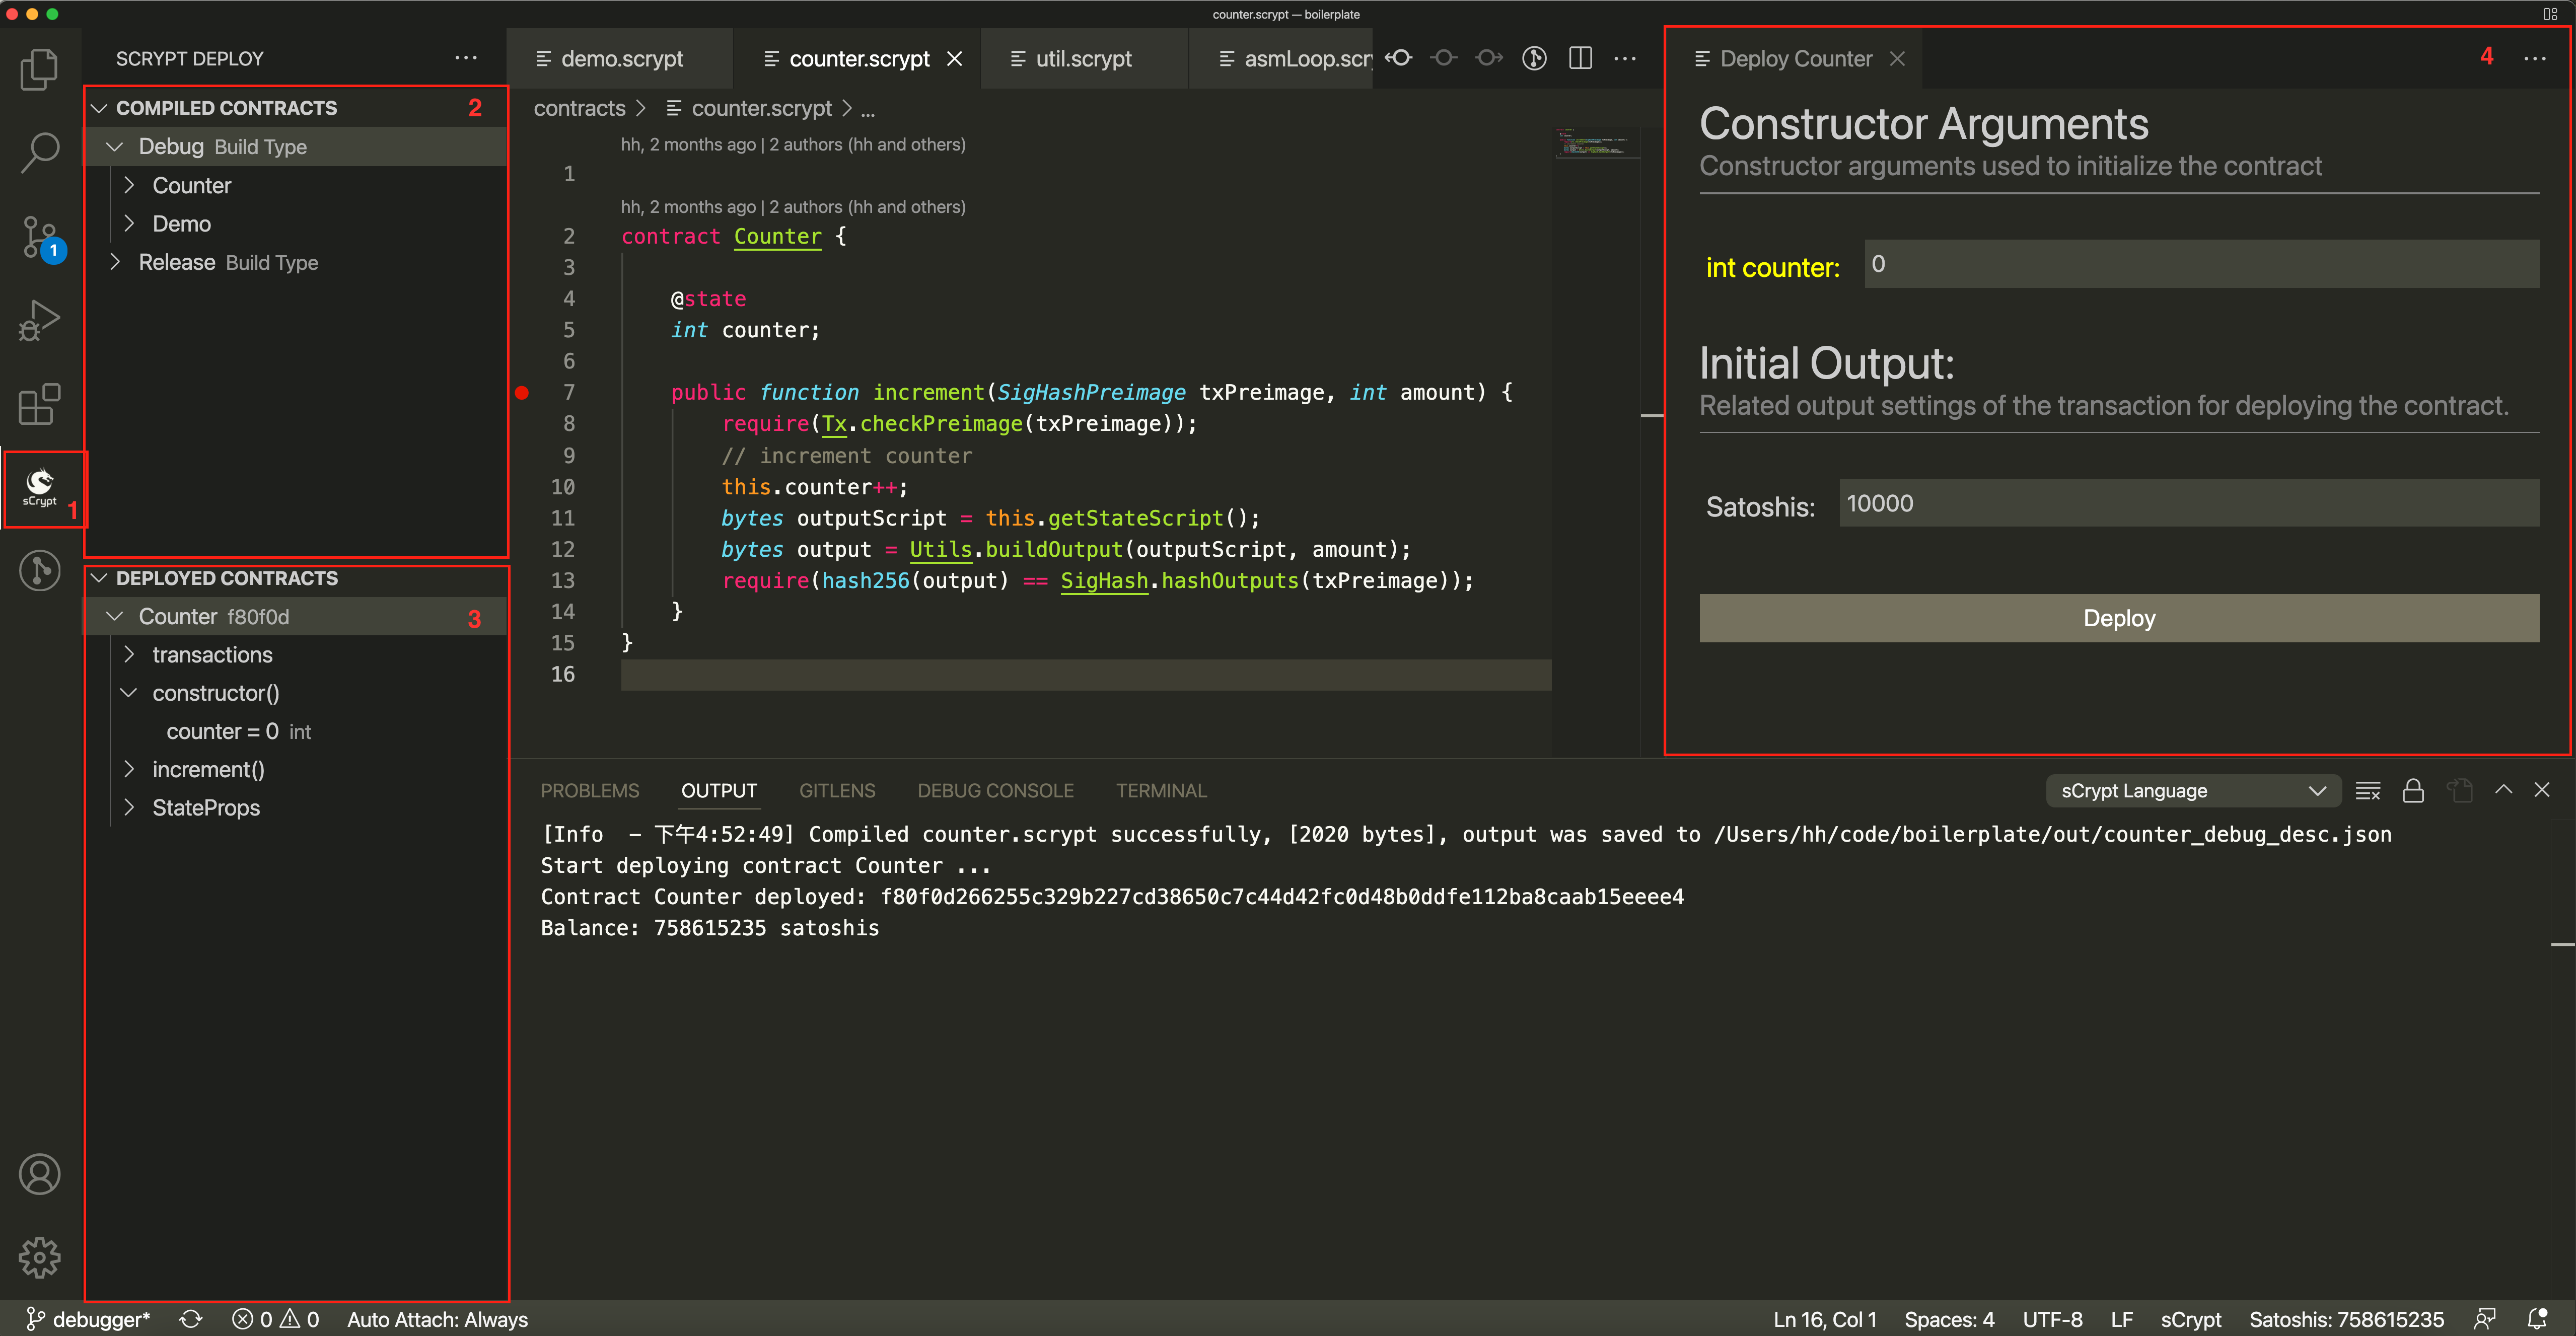
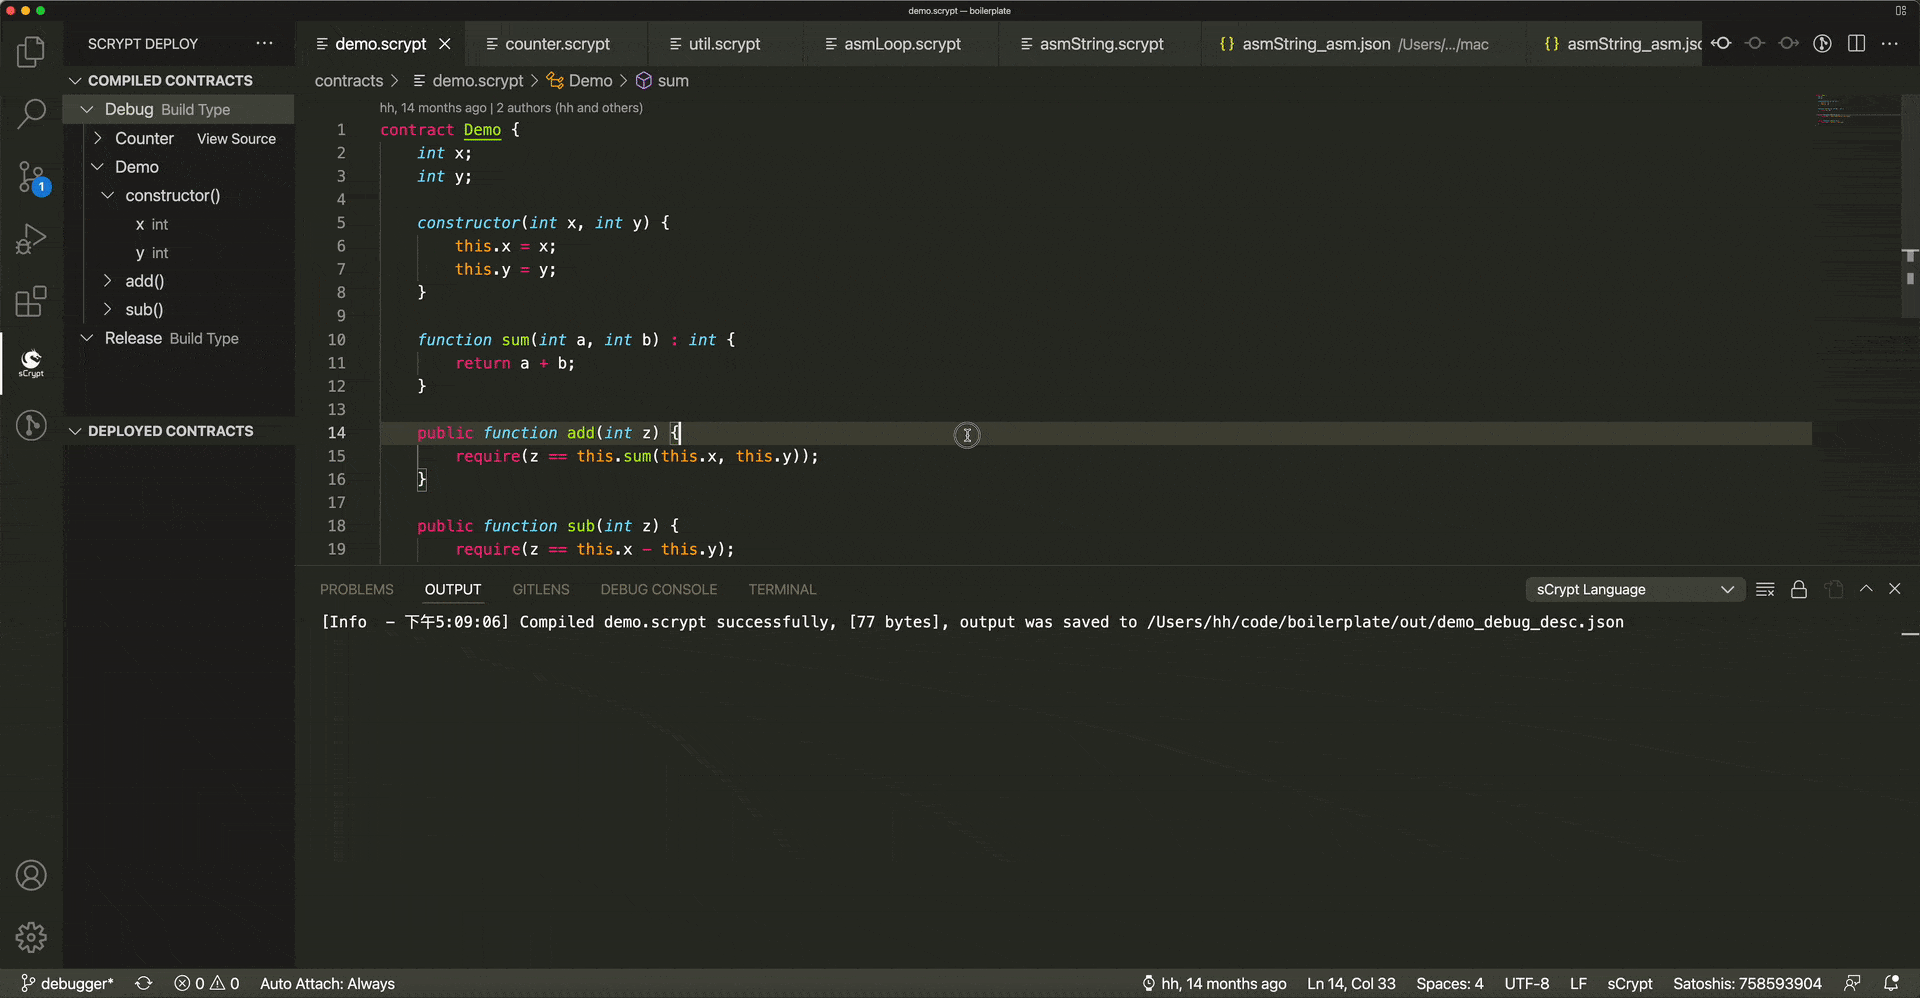
Local contracts window (COMPILED CONTRACTS). Load all compiled contract description files in the
outdirectory of the current workspaceContract instance window (DEPLOYED CONTRACTS). List contract instances that have been deployed successfully
Deployment contract configuration view. Fill in the relevant inputs of the deployment contract in this view, including: constructor arguments, satoshis balance amount locked in the contract, and the initial state of a stateful contract.
Note
The IDE supports deployment to both mainnet and testnet. You can specify a contract’s deployment network in Deployment Environment.
Set private key
To deploy a contract to the testnet, you need to set the private key. If it is not set yet, IDE will open the setting interface automatically and prompt you to set it
Deploy a Contract
Right-clicking on the Deploy Contract: Debug menu on the code editor will compile the contract and automatically open the Deploy Contract configuration view. The following information needs to be filled in the configuration view:
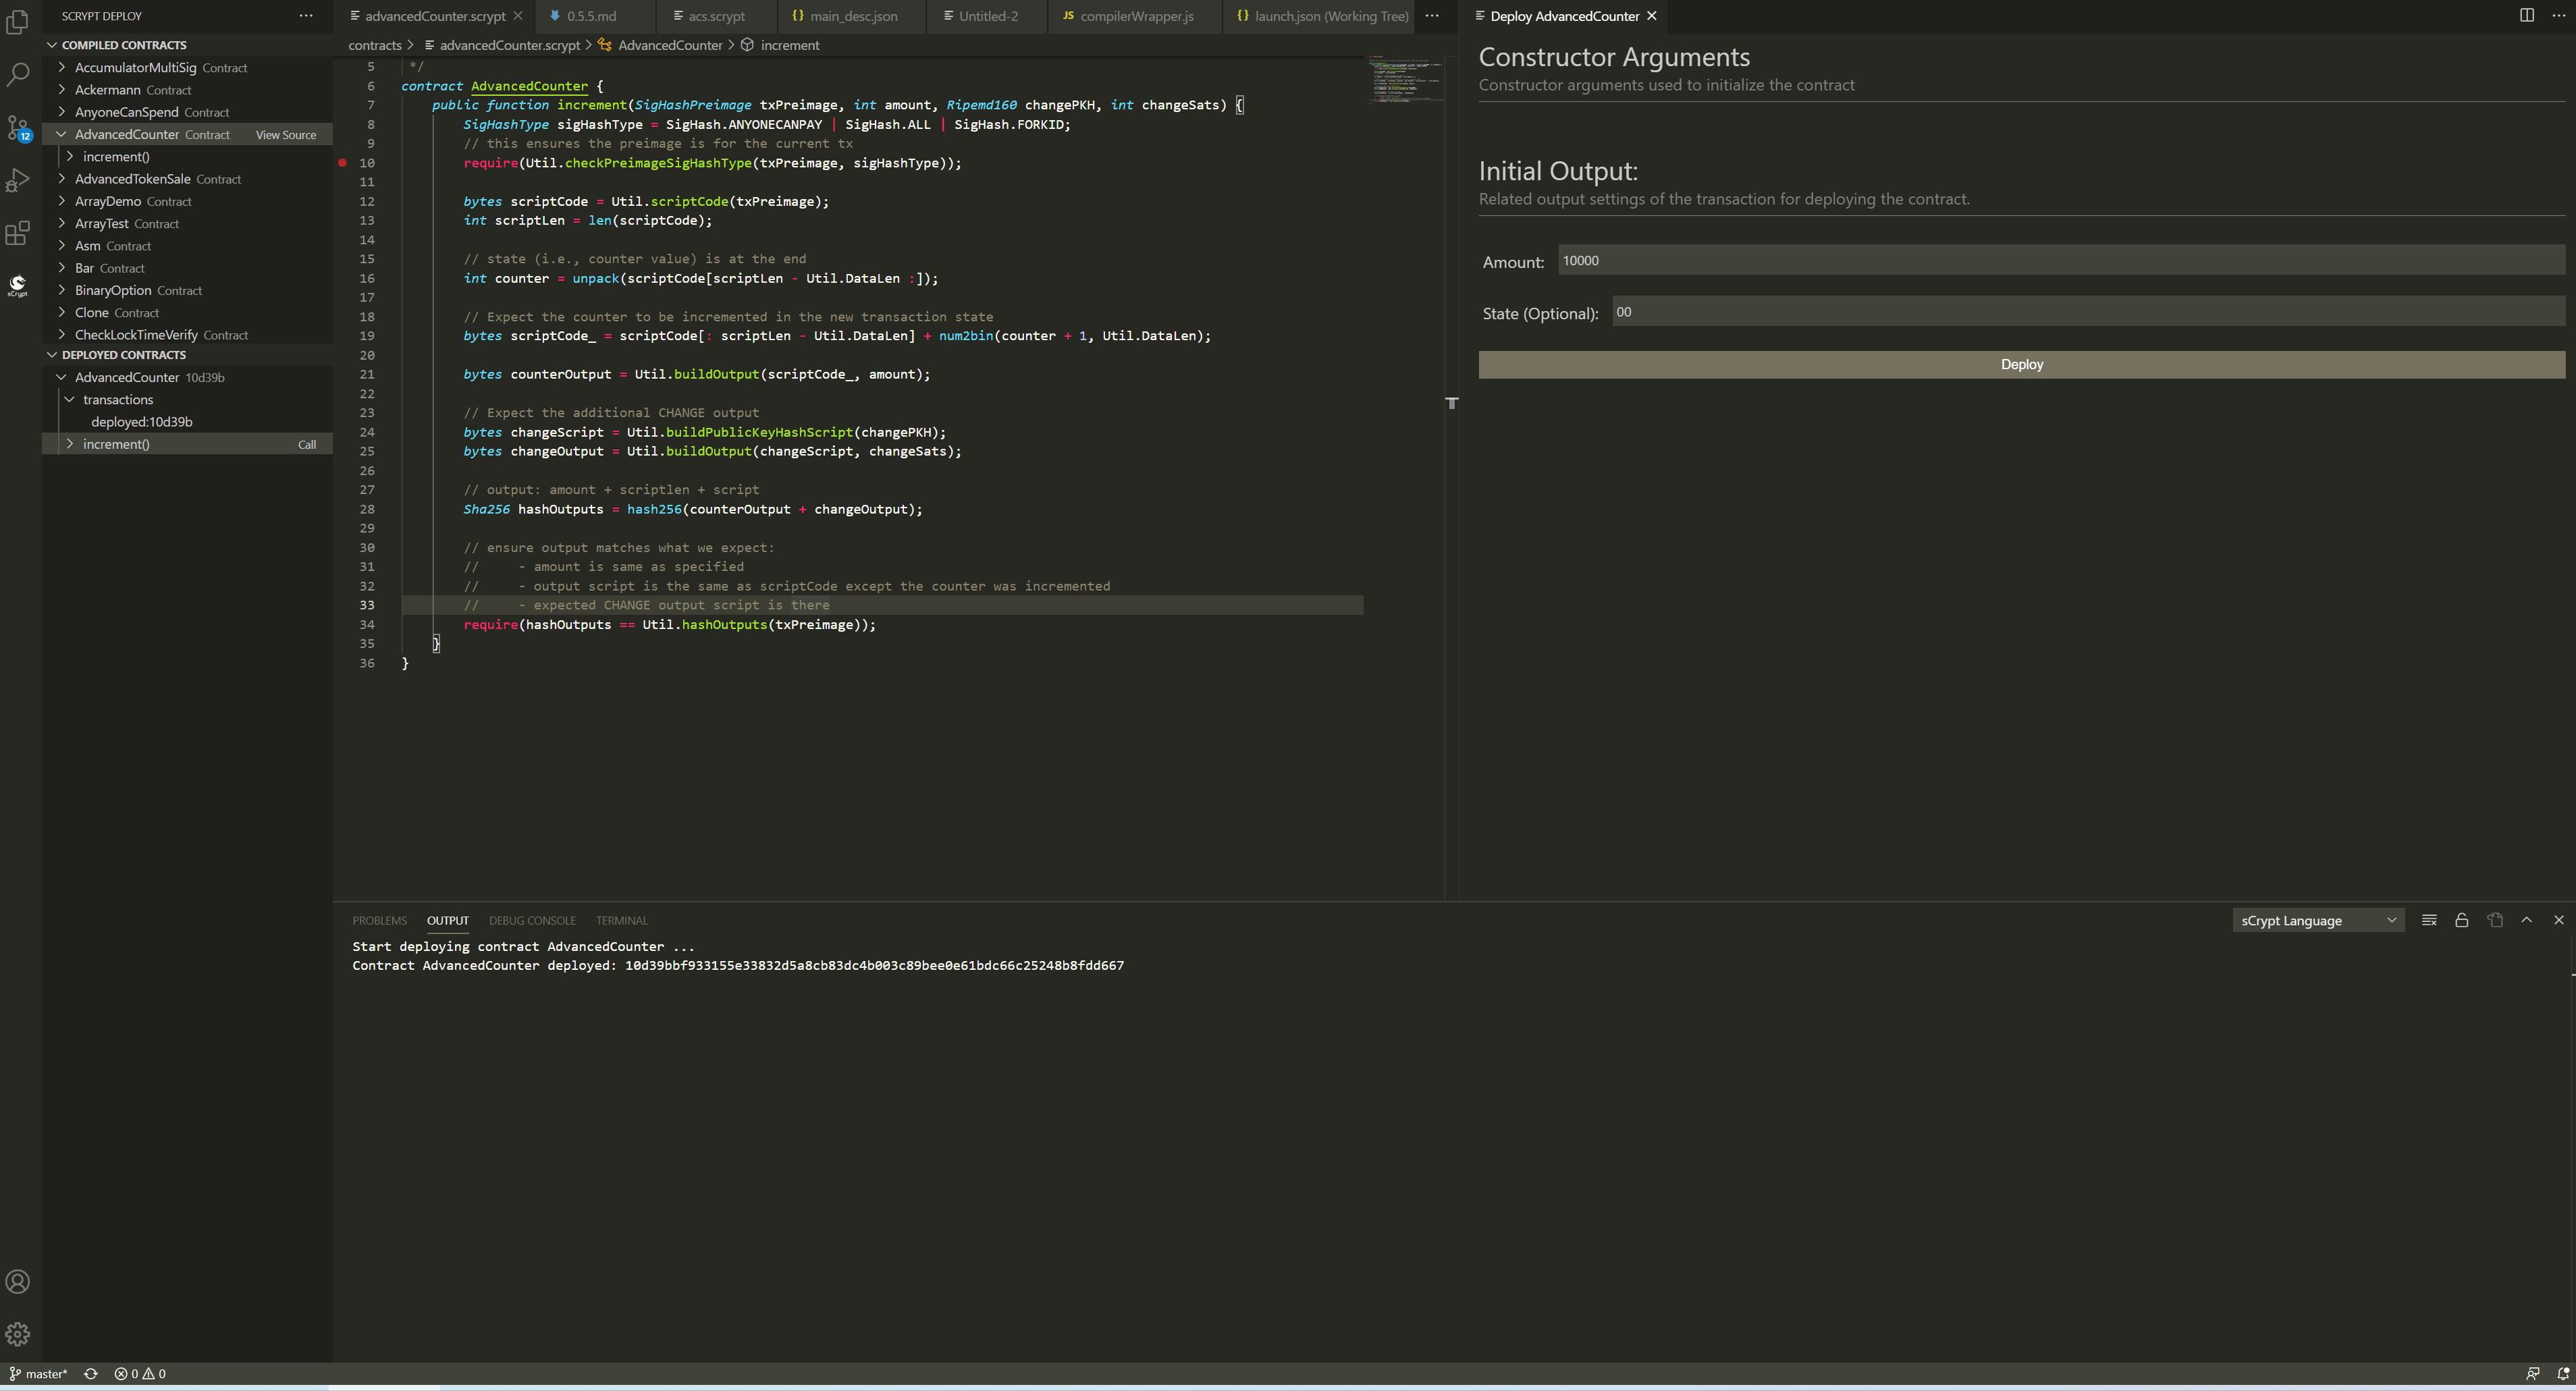
According to each parameter type of the contract constructor, fill in the parameters under Constructor Arguments
Fill the satoshis locked in the contract, the default is
10000satoshisIf it is a stateful contract without the
@statedecorator, you also need to fill in the initial stateThen click the Deploy button
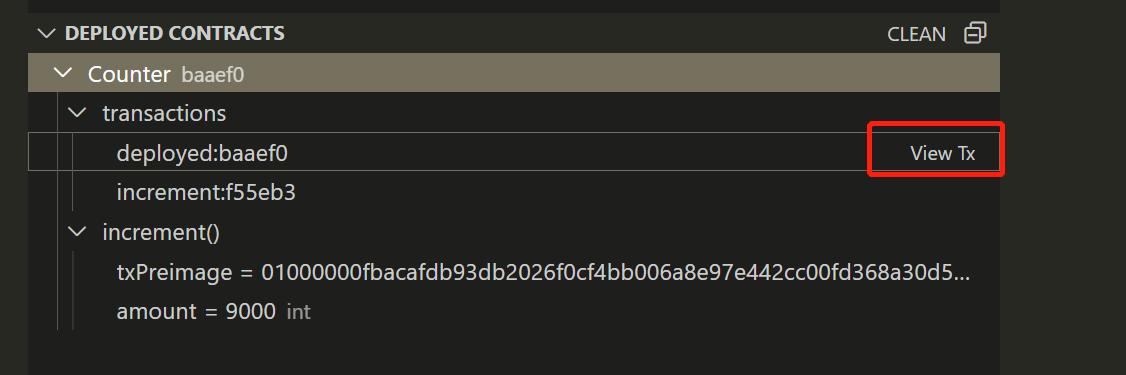
After the deployment is successful, you can see the log prompt in the output panel, and the corresponding instance will appear in the contract instance window on the left, click the View Tx button on the contract instance, you can open the browser to view corresponding transaction.
Call a Contract
Ordinary Contract
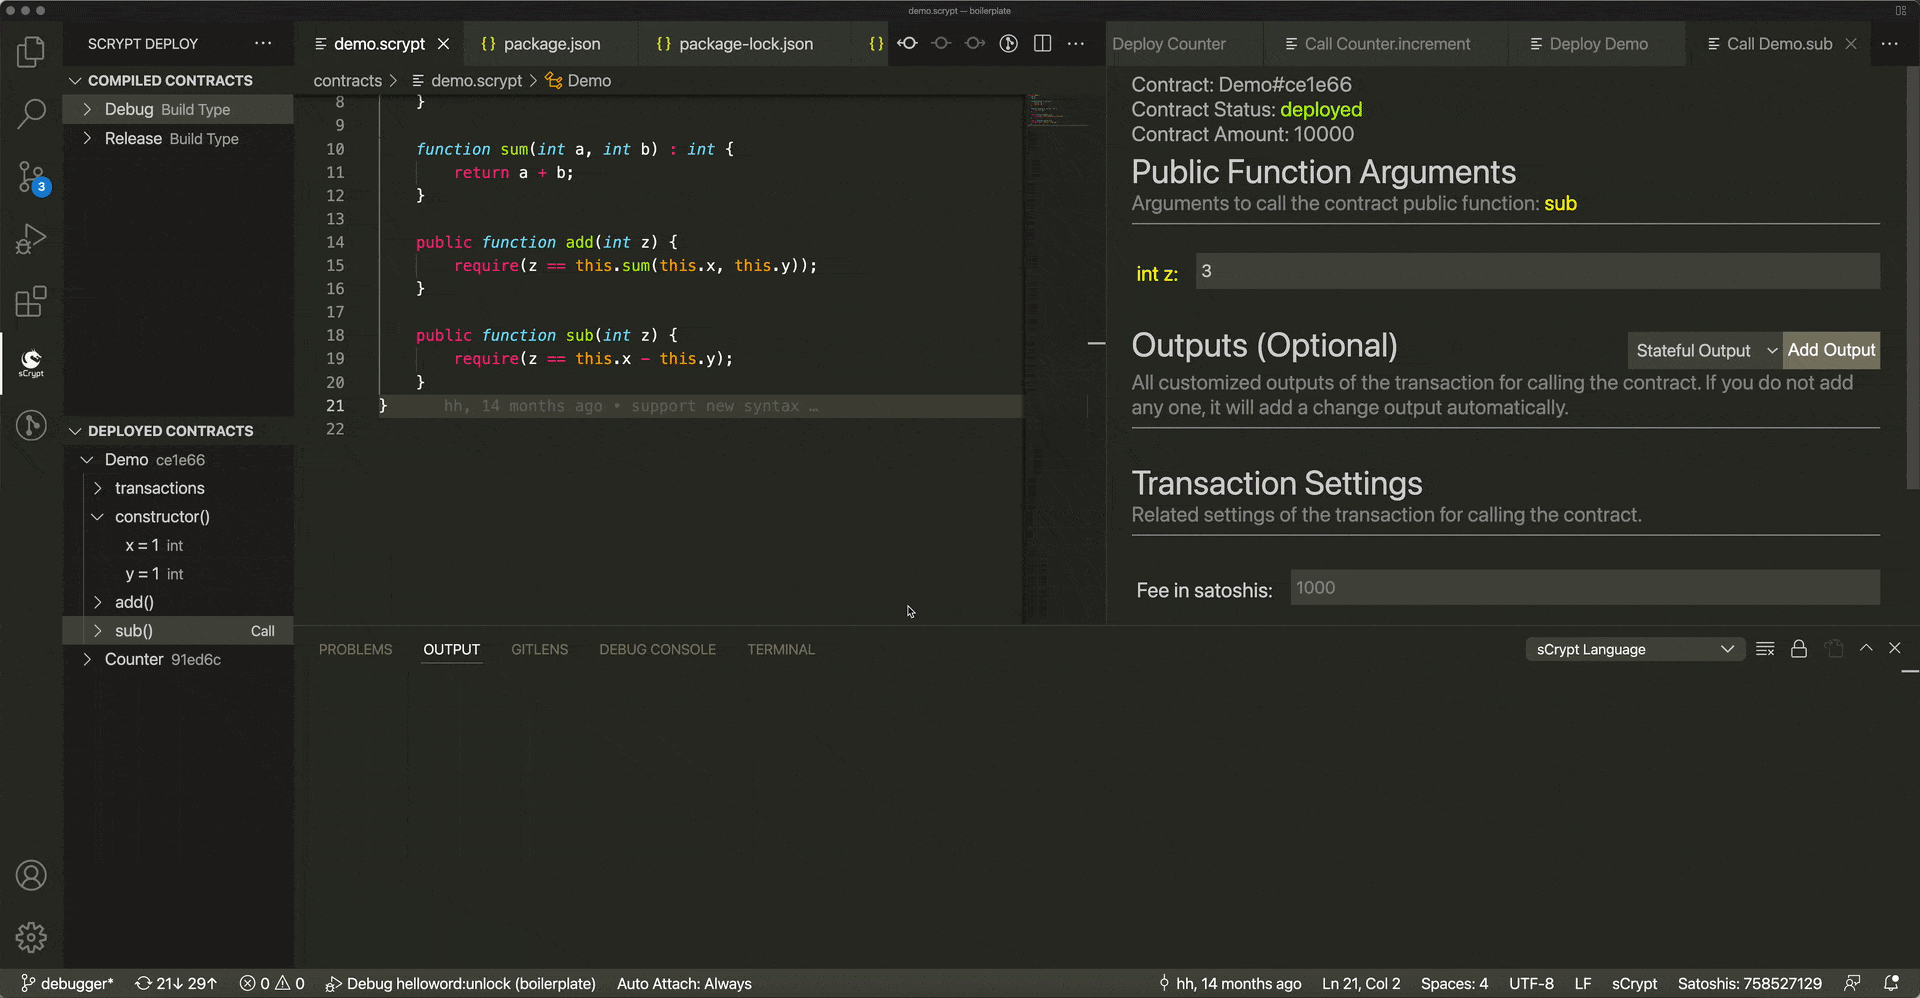
Click the constructor on the contract instance to view the actual parameters when the constructor is called. Click on the public function, and the call view of the function will appear on the right. For calling ordinary contracts, generally only need to fill in the correct unlock parameters under Public Function Arguments, and click the Call button to call the function. If the call is successful, you can see the corresponding transaction, and if it fails, the corresponding error will be printed.
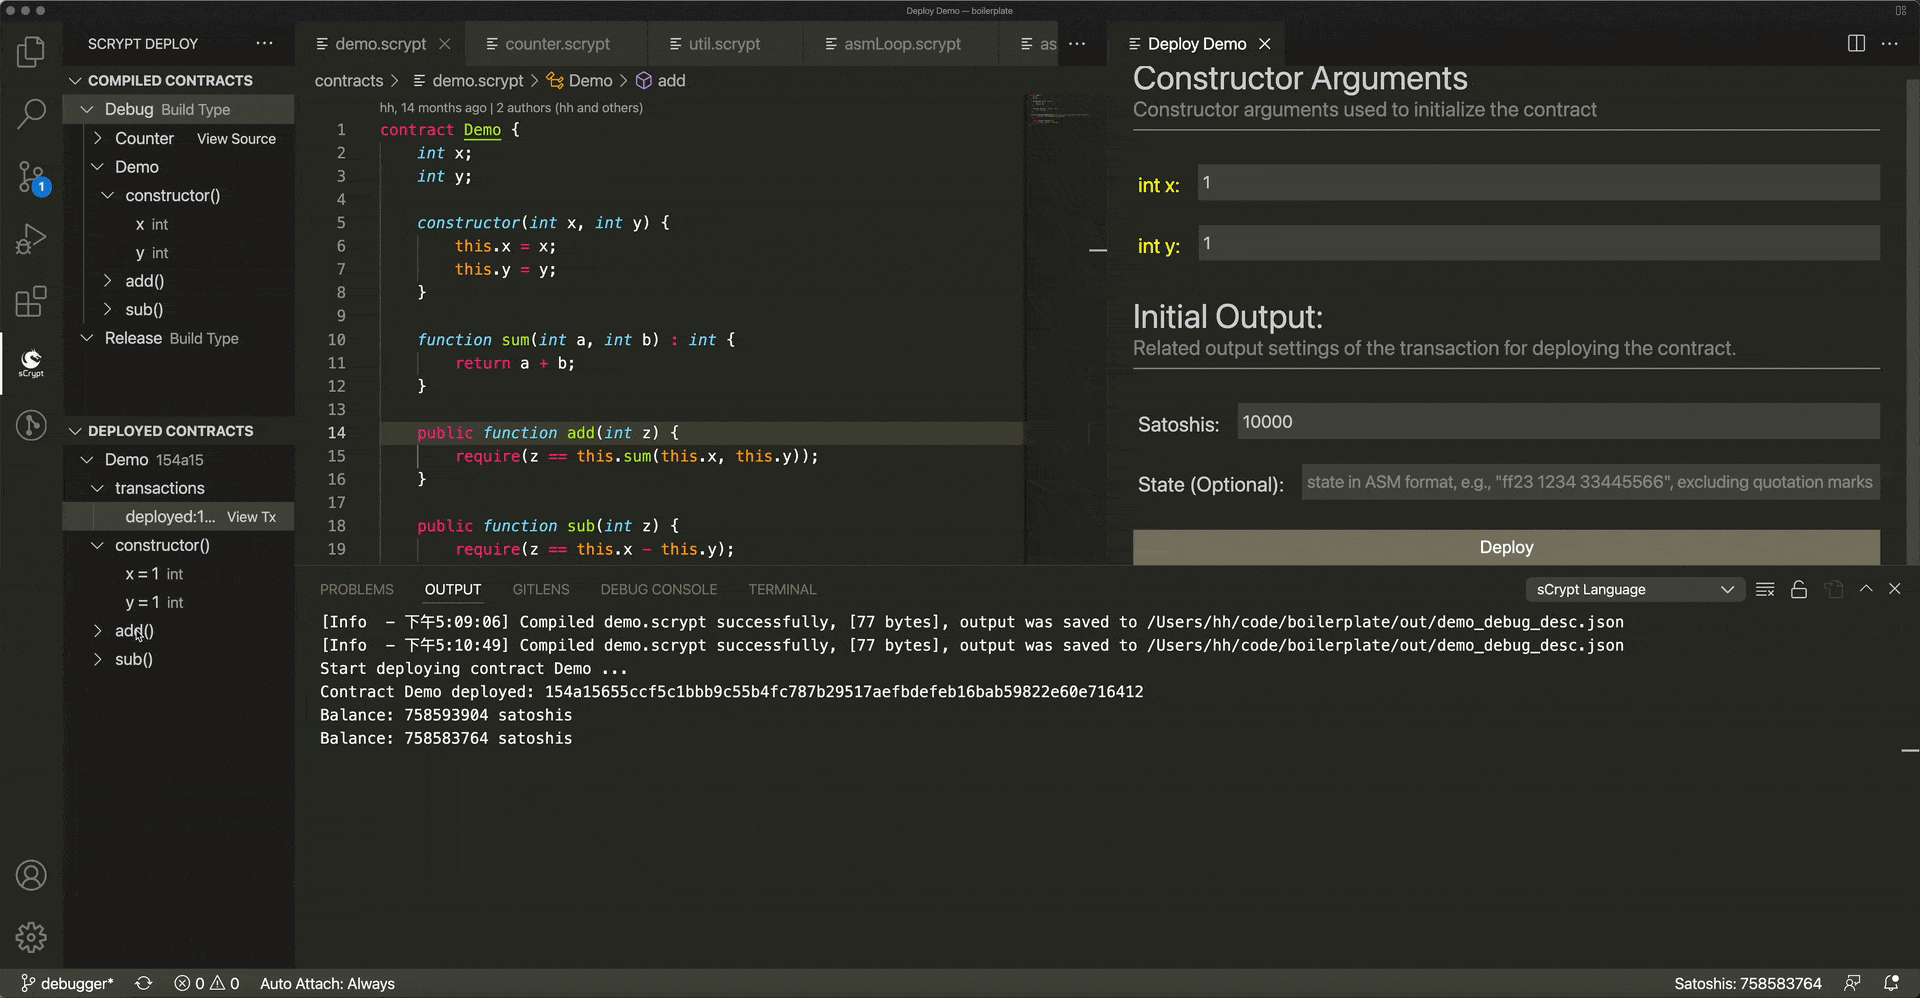
After the contract is called successfully, we can see the following information:
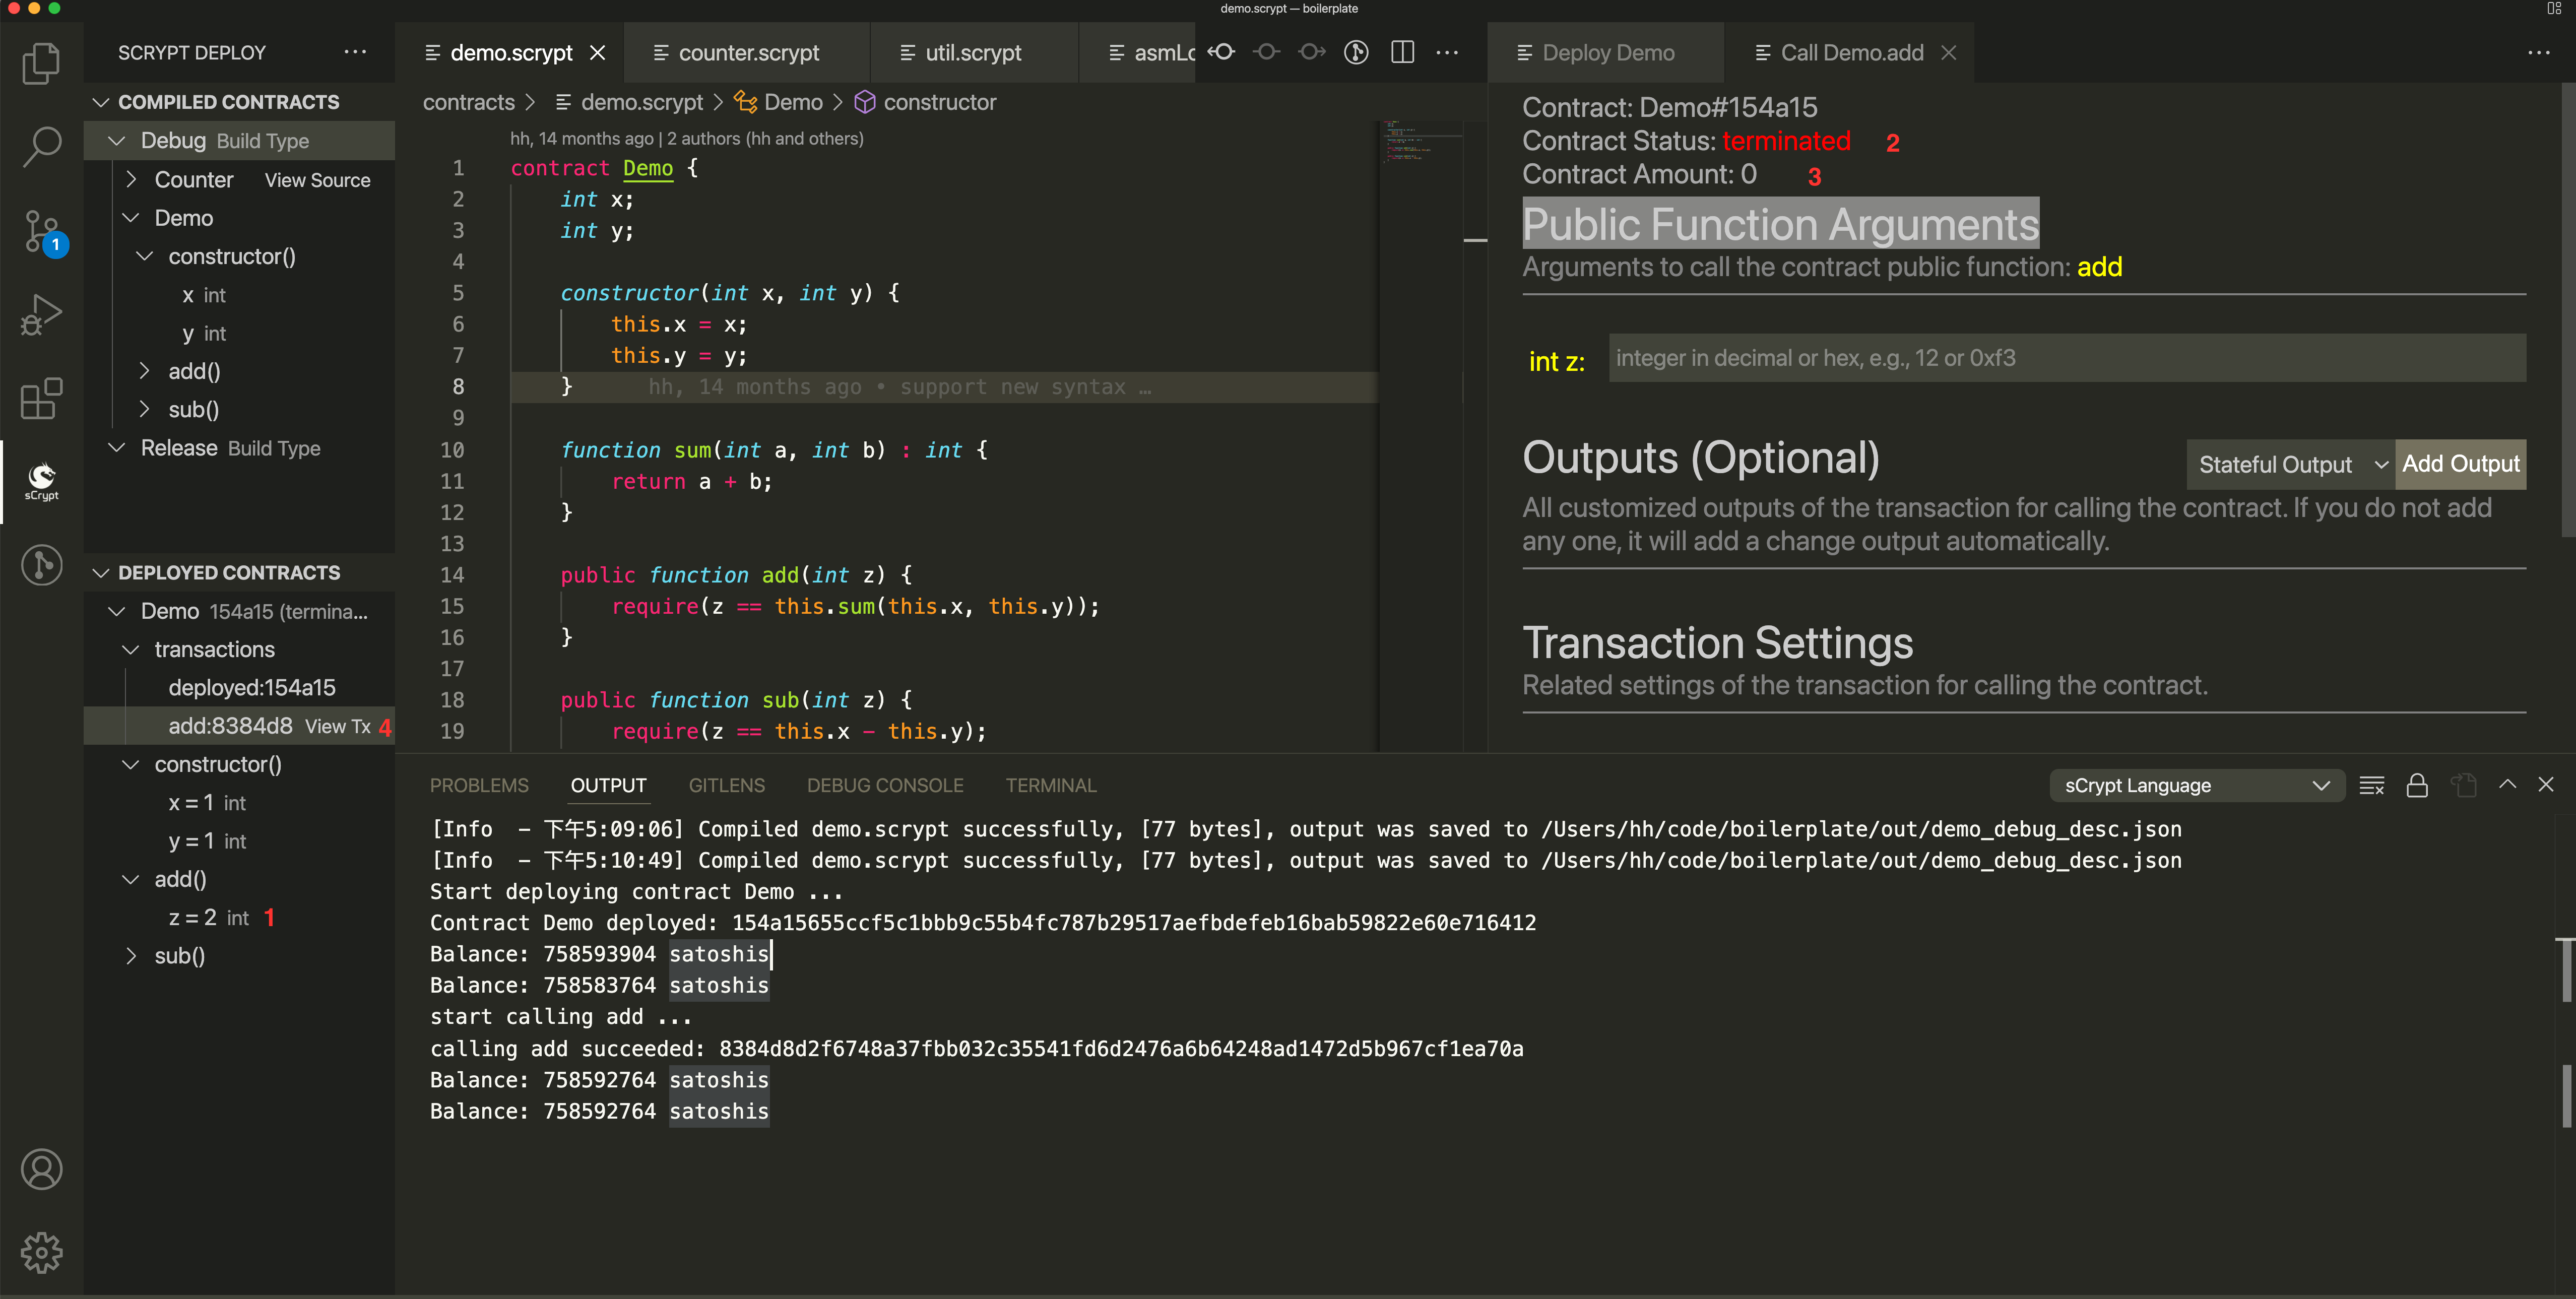
The value of the unlock parameter filled in when calling the contract
Whether the contract ends
satoshis remaining in the contract
The transaction generated by calling the contract, click the View Tx button to view the transaction.
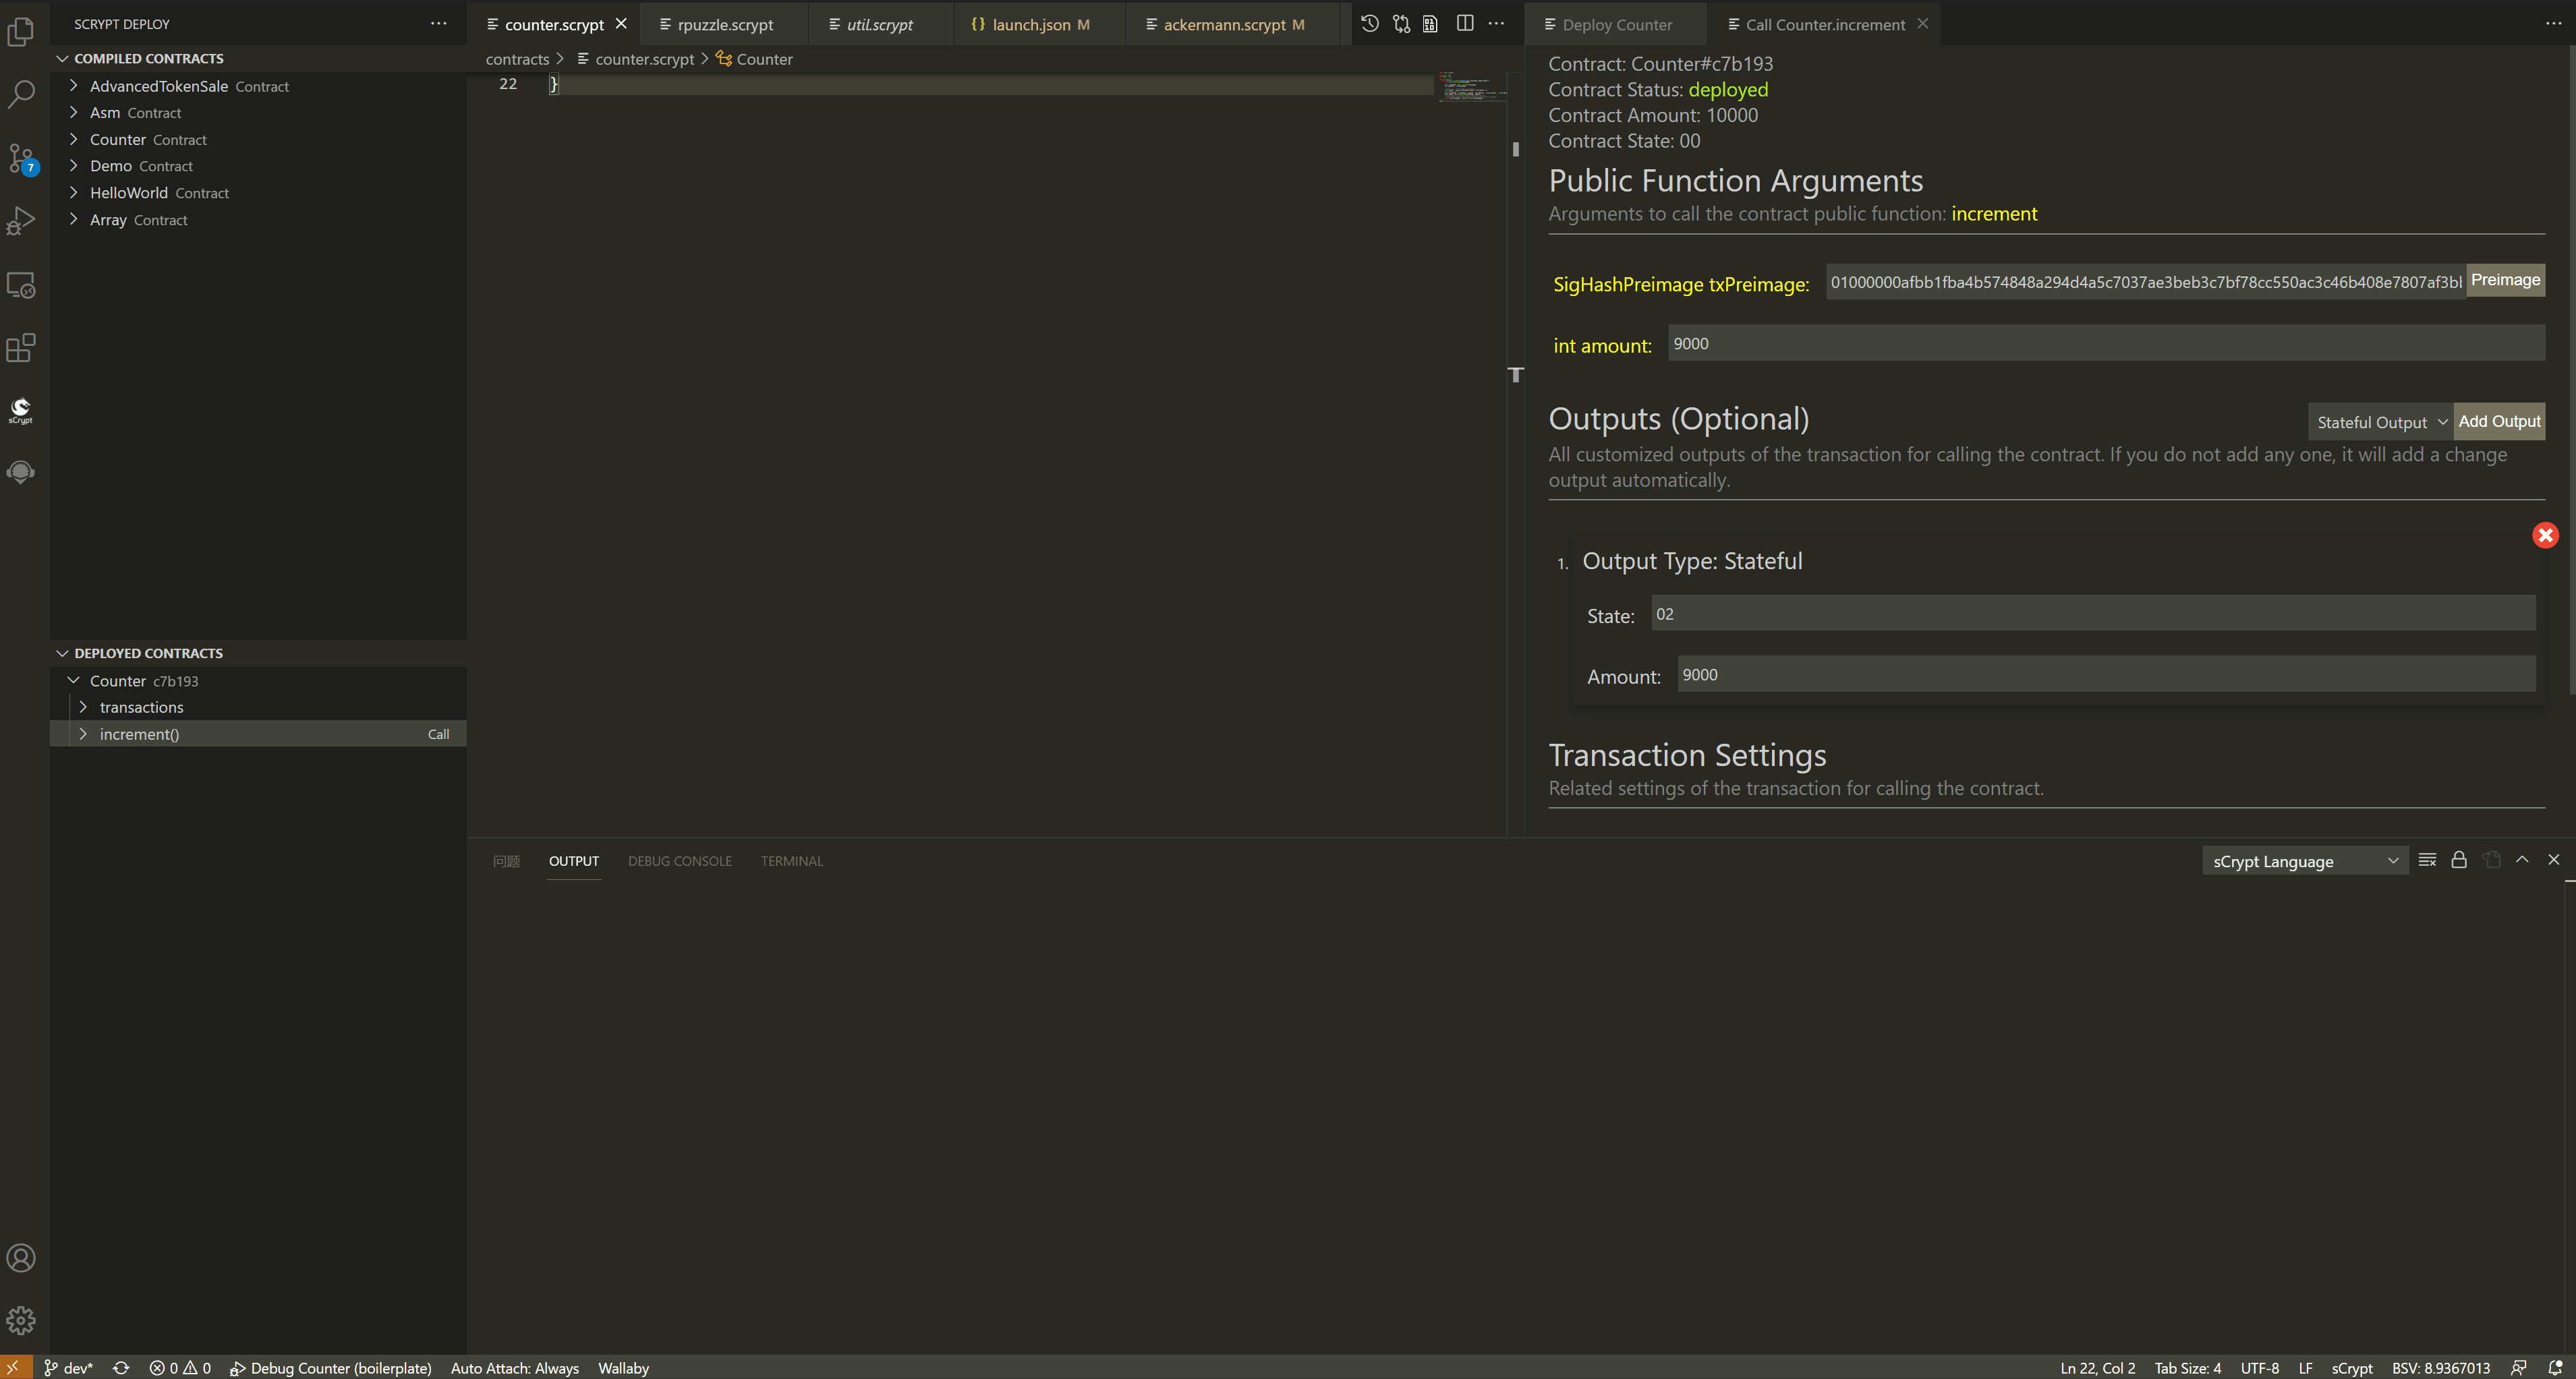
Stateful Contract
Calling a stateful contract requires more setup:
Fill in the correct unlock parameters (same as normal contracts). It should be noted that there are two special types of unlock parameters:
Add transaction output. For stateful contracts, you need to add the corresponding transaction output according to the contract’s restrictions. There are currently four output types supported:
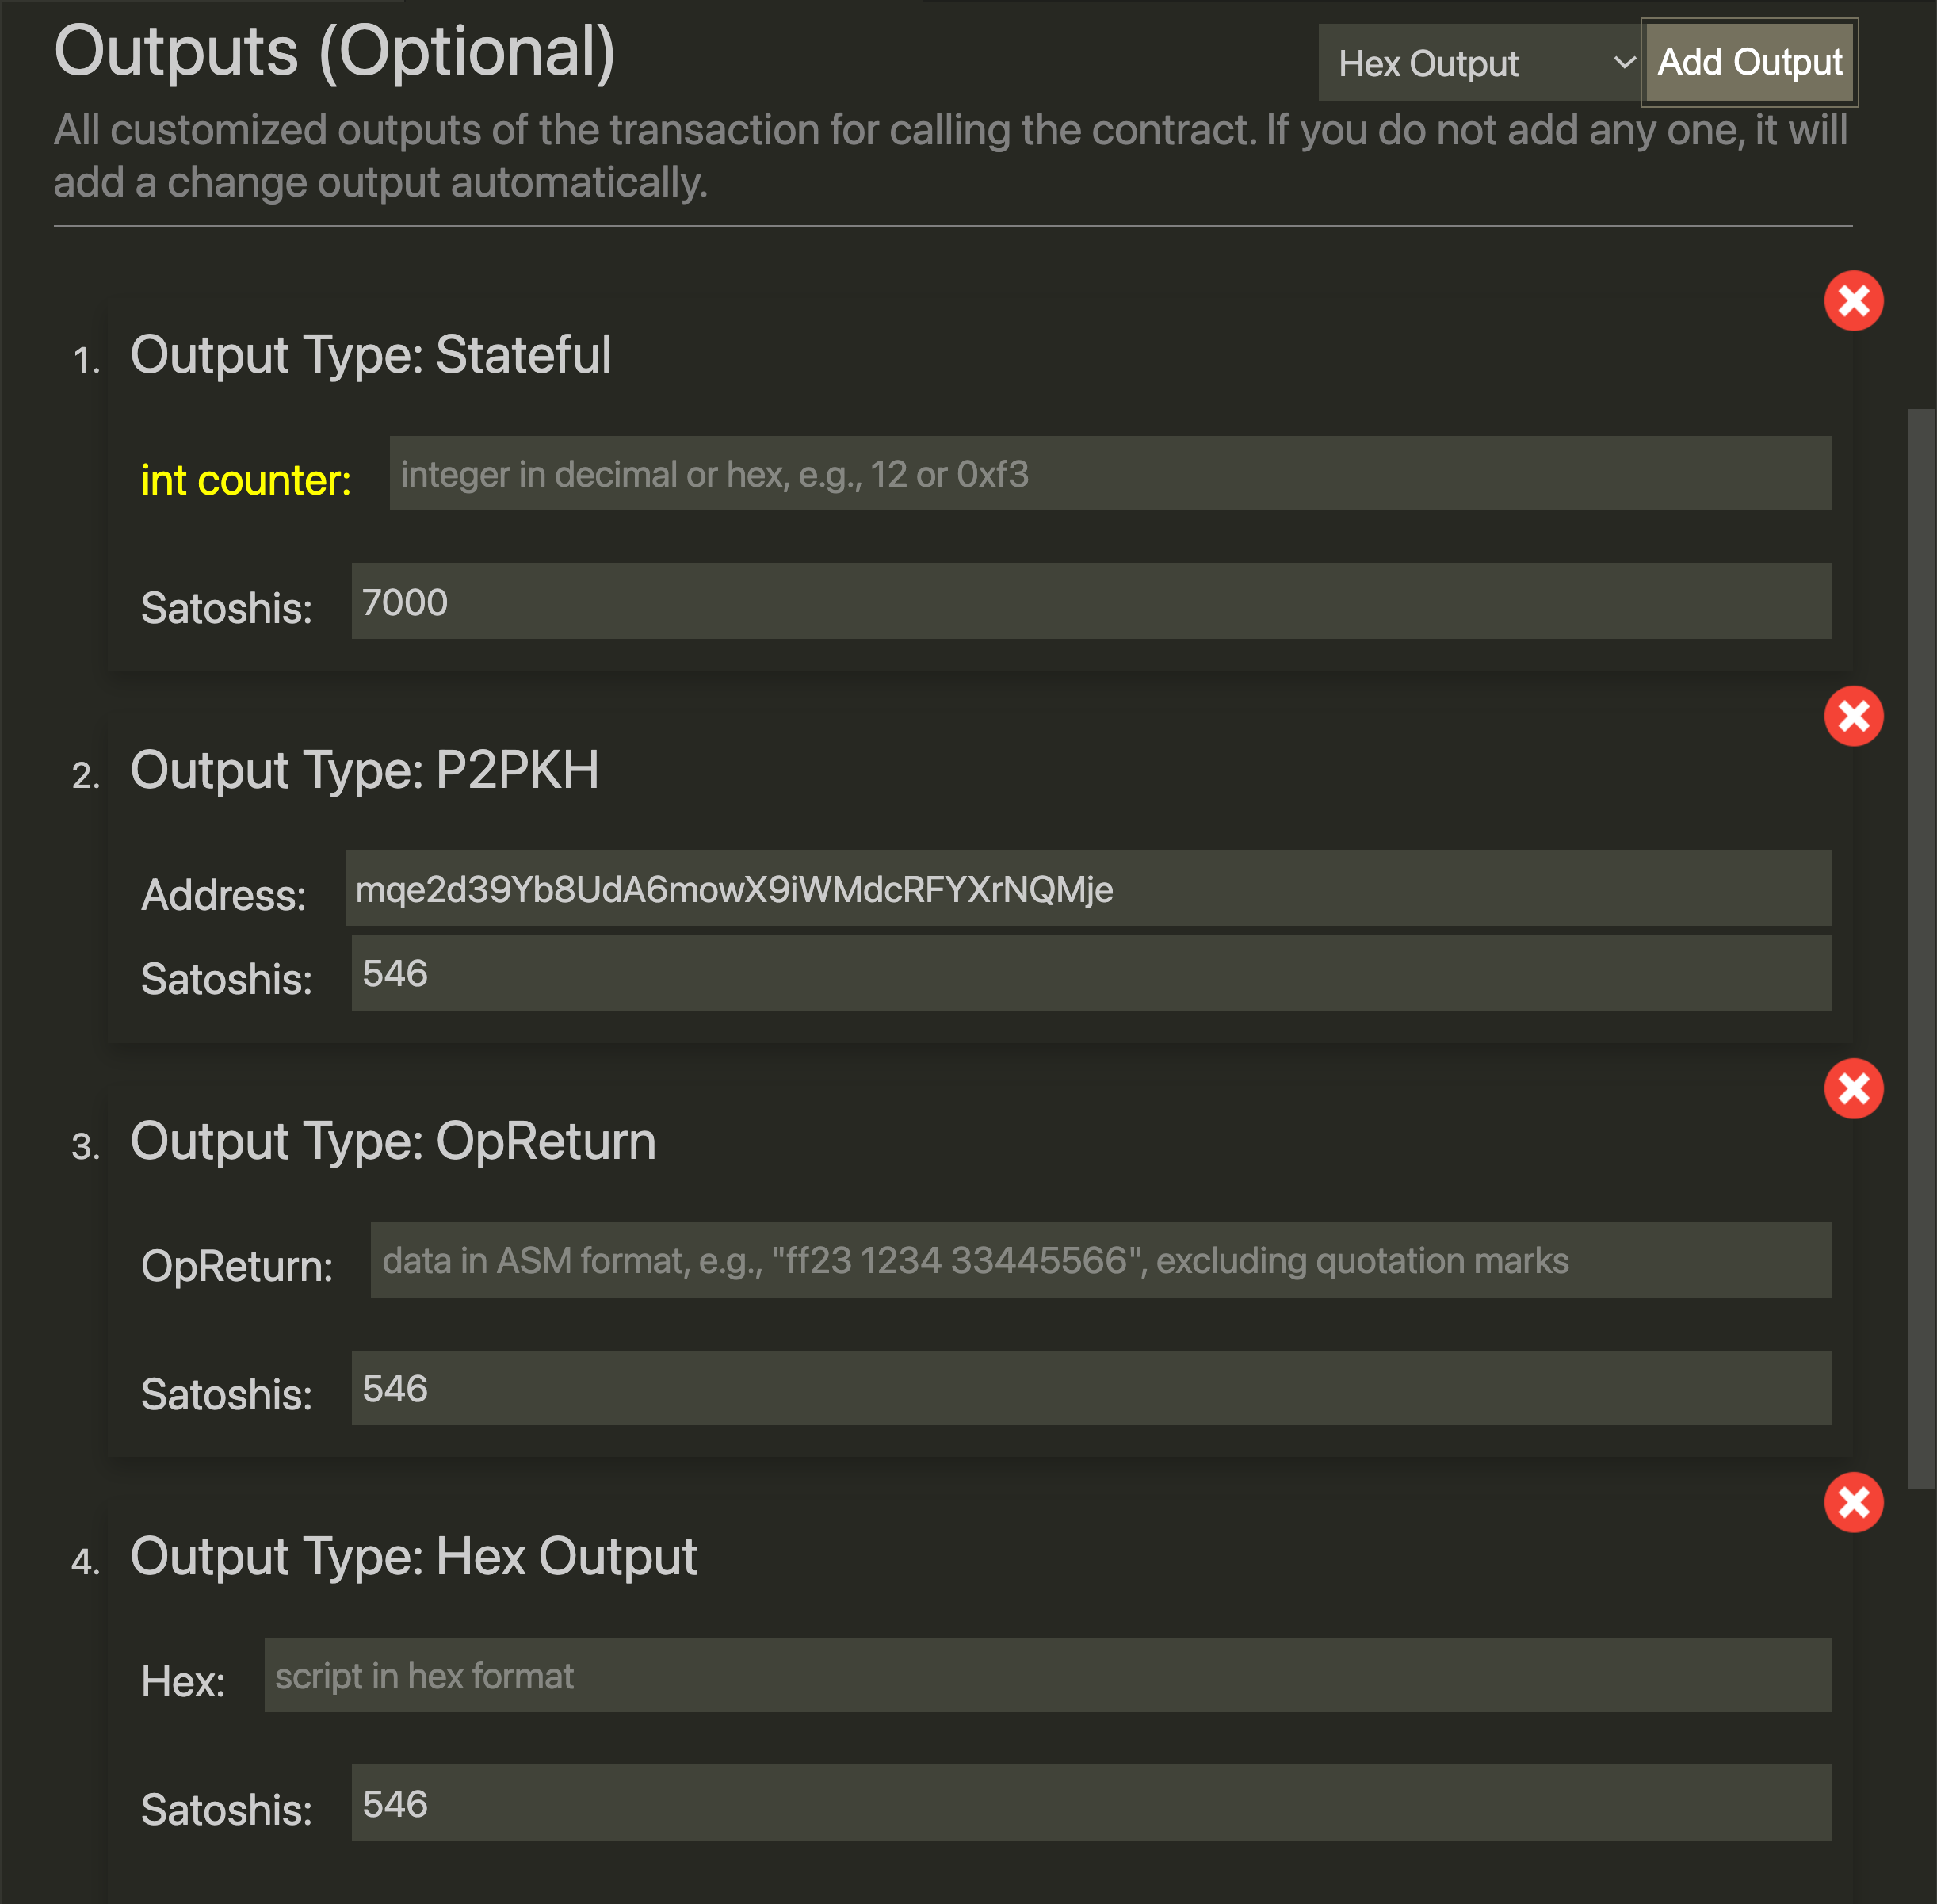
Output Type |
Parameter |
|---|---|
Stateful contract output |
|
P2PKH output |
|
OpReturn output |
|
Hex output |
|
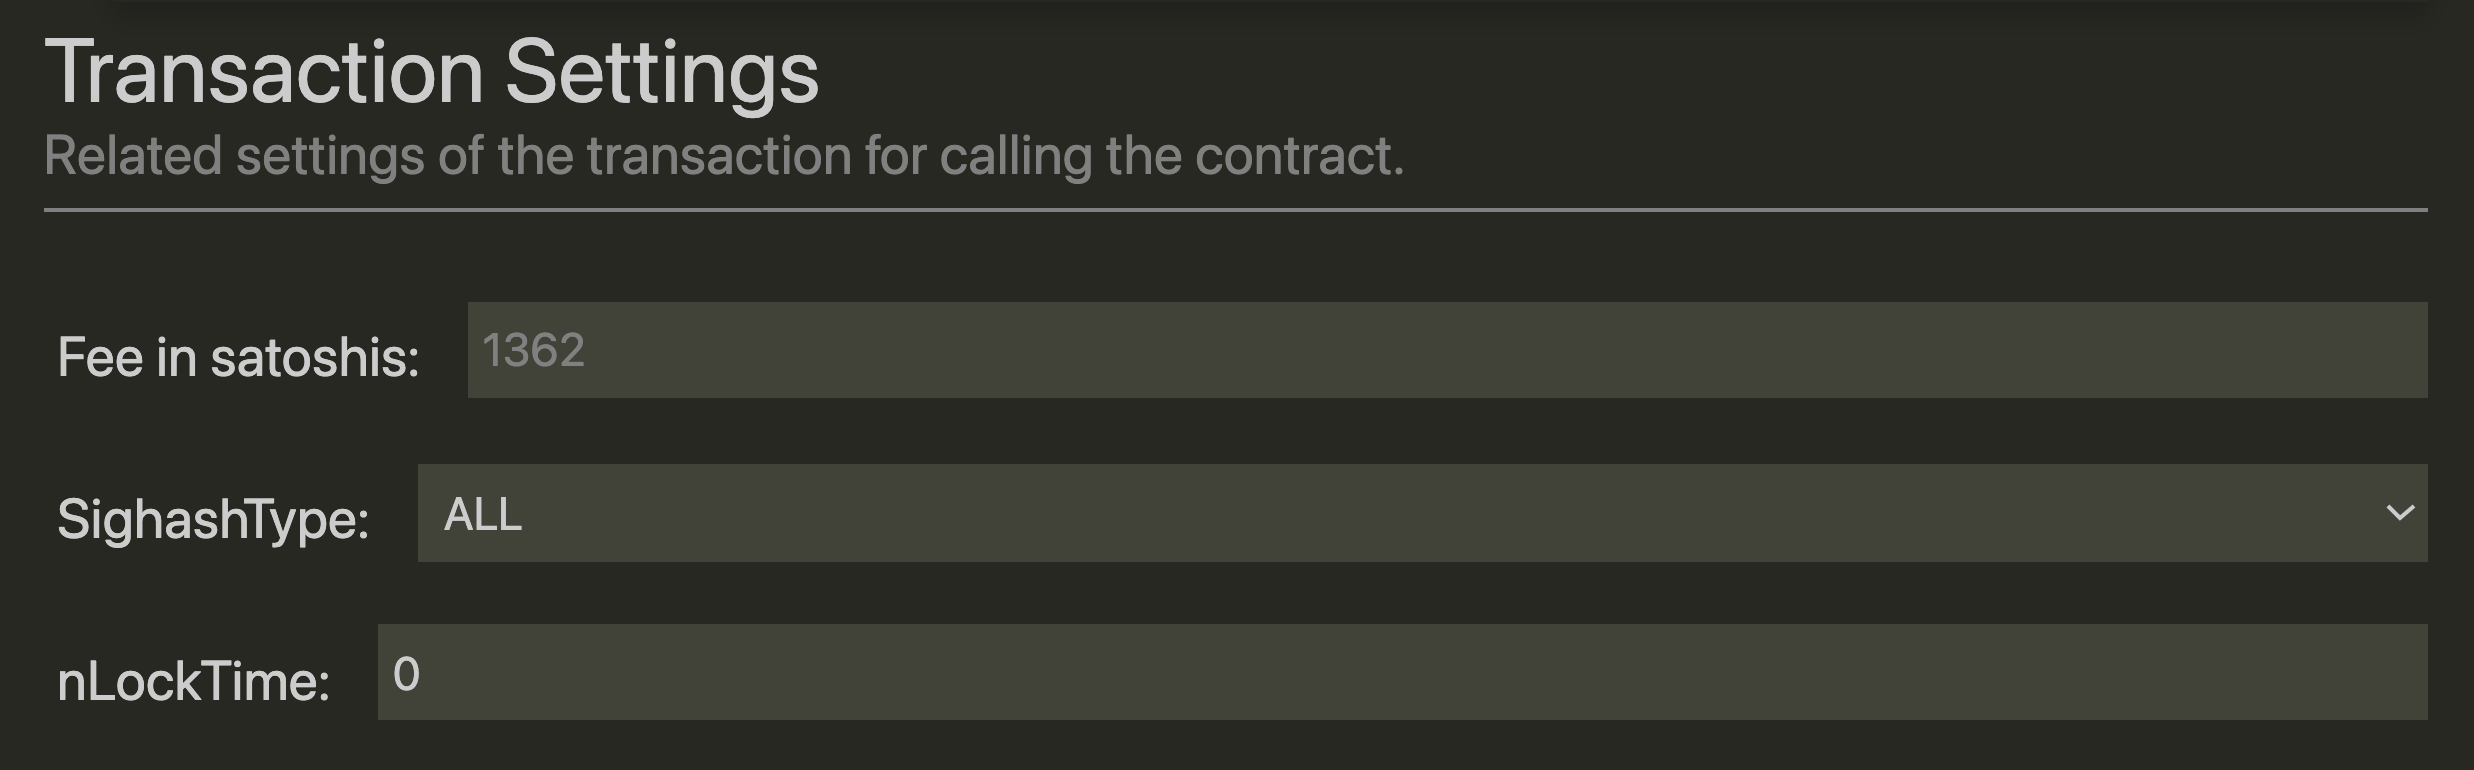
Set transaction-level parameters
Transaction fee
Fee: It is automatically calculated based on the summarized transaction outputs and the satoshis amount of the contract.Transaction signature type
SighashType: The default signature type used to calculate the preimage of the transaction is ALL, and this value can be modified according to the transaction signature type used in the contract.nLockTime: nLockTime is a parameter applied to each transaction specified in unix time or block height. Before this, the transaction cannot be accepted into a block.
Click the Call button to call the contract
After all settings are completed, click the Call button to send this contract call transaction to testnet. After the transaction is sent successfully, you can see that the contract balance displayed at the top is updated. The transaction is added to the transactions sub-item of the contract instance, and it can be viewed on the block explorer through the View Tx button on the right. In addition, when the transaction sub-item is selected, the arguments passed to the called function will be displayed.
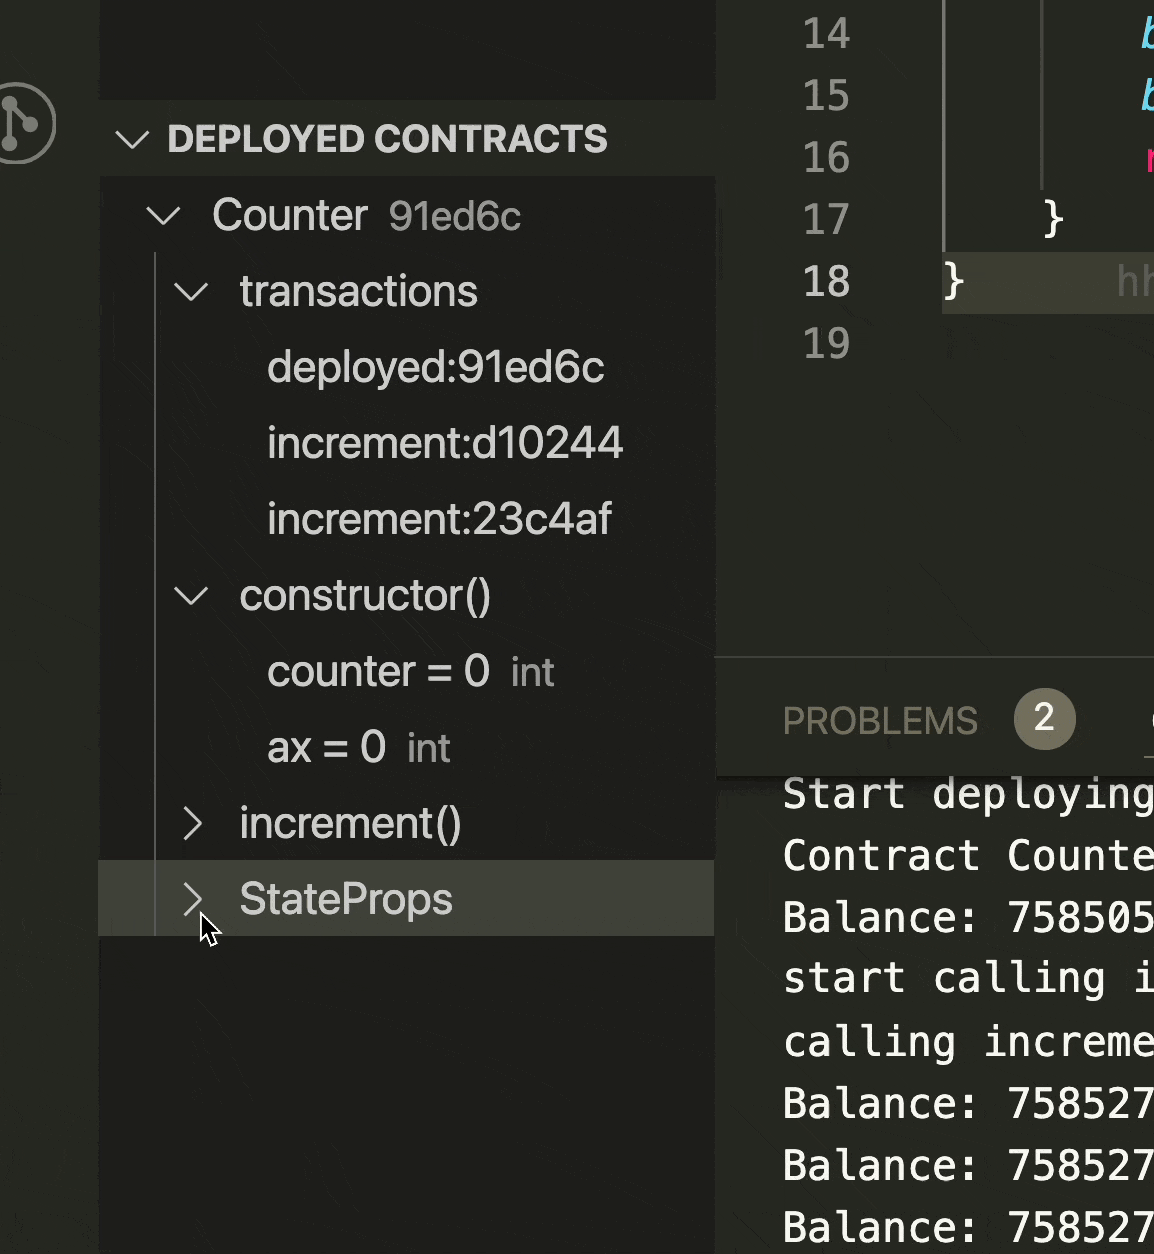
Repeated calls
For stateful contracts, you can repeat the above steps to continue calling its public function and observe its state changes. The latest state of the contract can be viewed on the StateProp entry in the contract instance window.
If calling the contract fails, the Outpu panel will print out the link of Starting the debugger. CTRL + click the link to start the debugger
Note
Currently, we do NOT support merging other inputs to call a contract.
Call Failure
Normally, if a call to a contract fails, the corresponding information will be shown in the output panel, and the Launch Debugger link will be generated. CRTL + Click the link will directly launch the debugger session based on the arguments in the test.
Stateful contract output
The output of a stateful contract contains output in two formats:
- Stateful contracts do not contain properties with the
@statedecorator.You need to fill in
State(the serialized value of the contract state, in hex format) andAmount(the balance satoshis locked in the contract).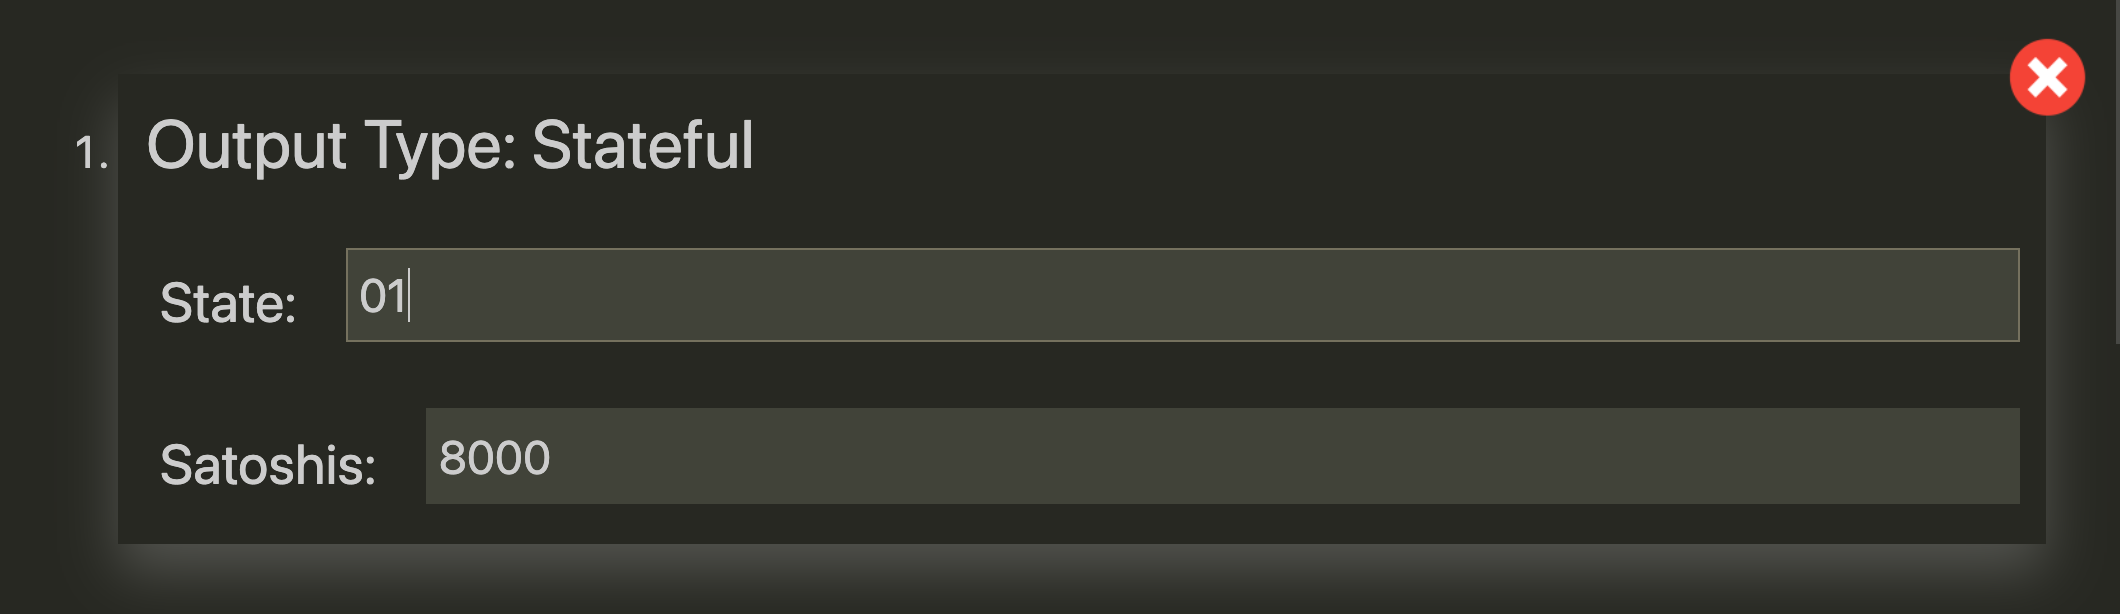
- Stateful contracts contain properties with the
@statedecorator.The
Amountparameter needs to be filled in, as well as all properties decorated with the@statedecorator.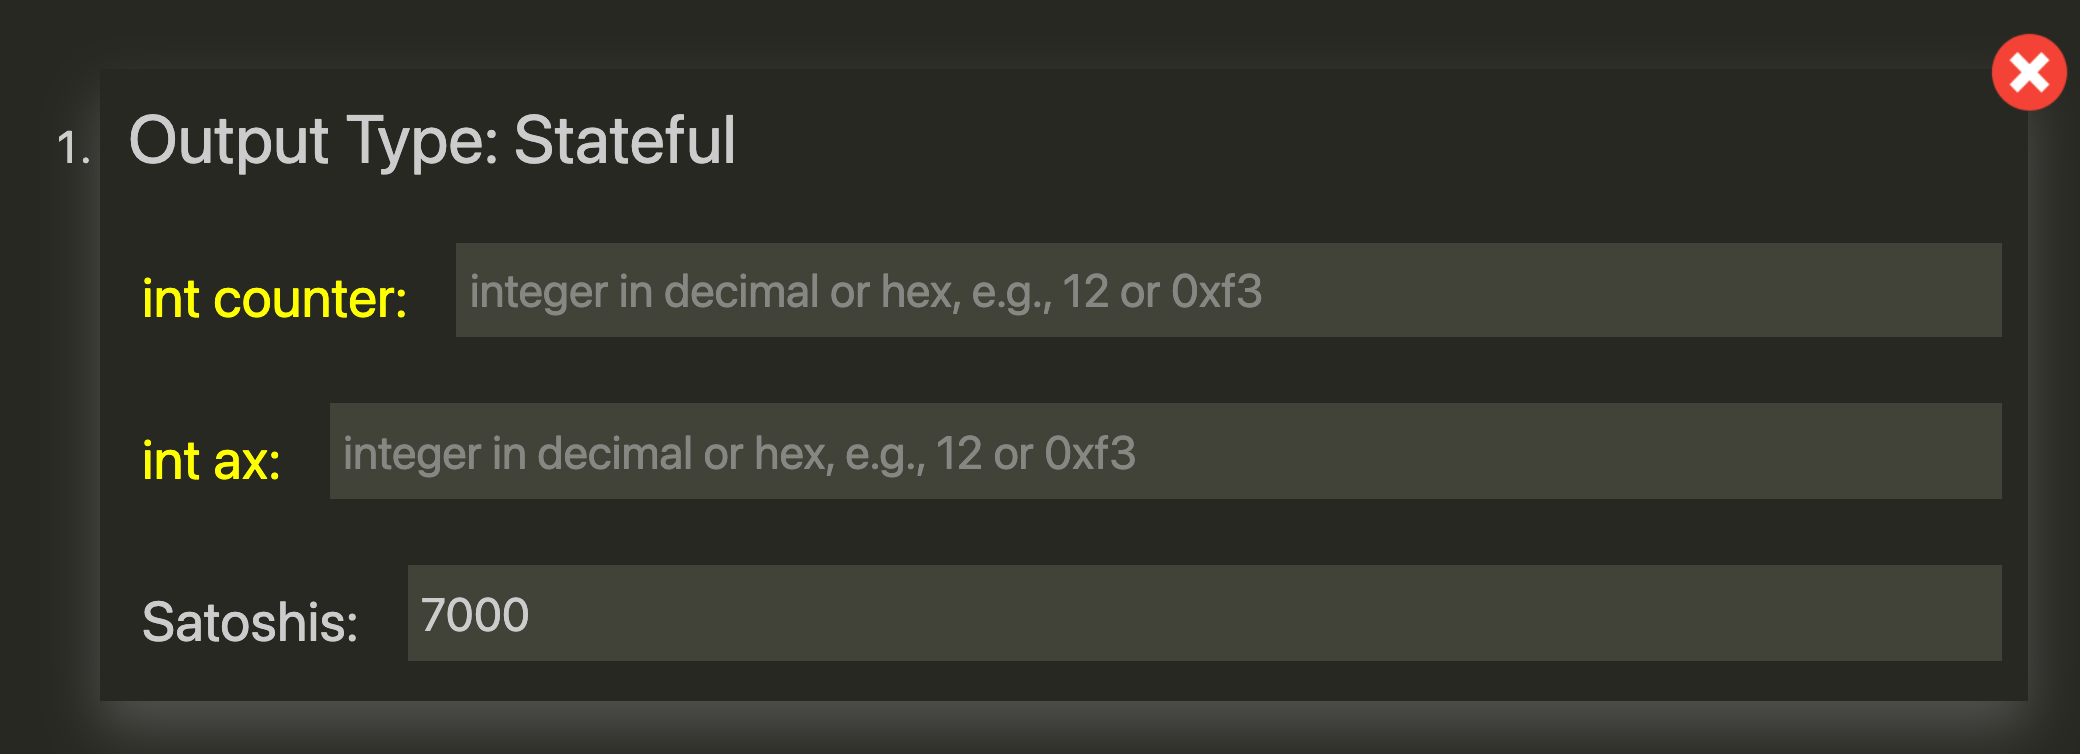
Argument Input Format
All parameter types
Both deploying a contract and calling it requires correct parameters in the view. Refer to the table below for the parameter input format:
Parameter Type |
Input format description |
|---|---|
bool |
|
int |
Decimal number or hexadecimal number, for example: |
bytes |
Hexadecimal string, for example: |
PubKey |
Hexadecimal string, same as |
PrivKey |
Same as |
Sig |
Hexadecimal string, same as |
Ripemd160 |
Hexadecimal string, same as |
Sha1 |
Hexadecimal string, same as |
Sha256 |
Hexadecimal string, same as |
SigHashType |
Hexadecimal string, same as |
SigHashPreimage |
Hexadecimal string, same as |
OpCodeType |
Hexadecimal string, same as |
Array |
Fill in each element separately |
Structure |
Fill in each struct field separately |
Special parameter type
SigtypeNo need to fill in manually. IDE uses the private key in the settings to automatically generate a signature by default, as the default value of this parameter. If you need to sign with another private key, click the Sig button on the right side of the input box, and enter the correct private key in the pop-up input box. IDE will generate a new parameter value based on the entered private key and update the parameter automatically.
SigHashPreimagetypeNo need to fill in manually. IDE will calculate the preimage of the first input of the transaction based on the output you add and the transaction-related parameters set, such as
SigHashType,nLockTime, and automatically update the parameter.
Other Features
View Transaction
The transactions sub-item under the contract instance window has a View Tx button. Click it to open a block explorer to view the transaction details.
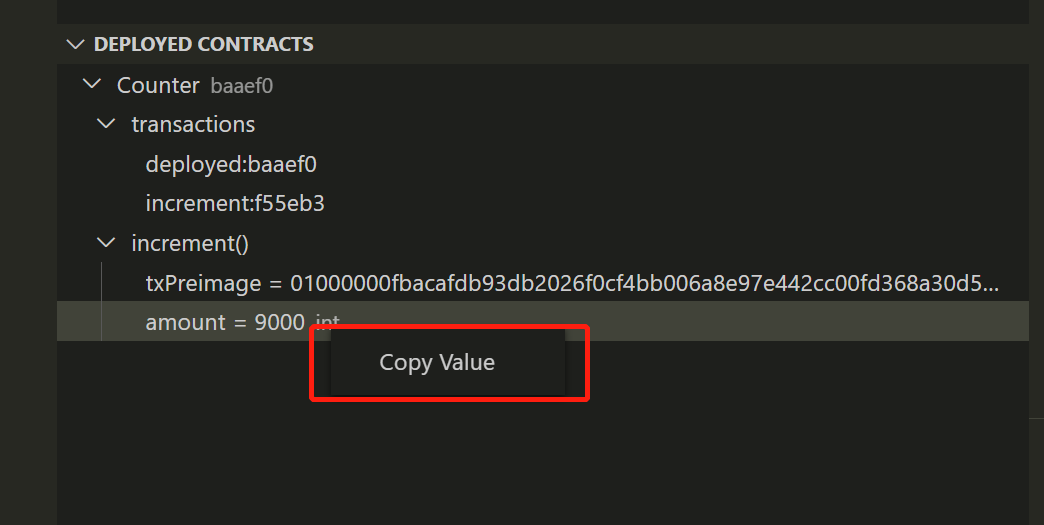
Copy Value
Select a function in the contract instance window, right-click on the parameter list, and the Copy Value menu will appear. Click this menu to copy the value of the parameter to the clipboard.
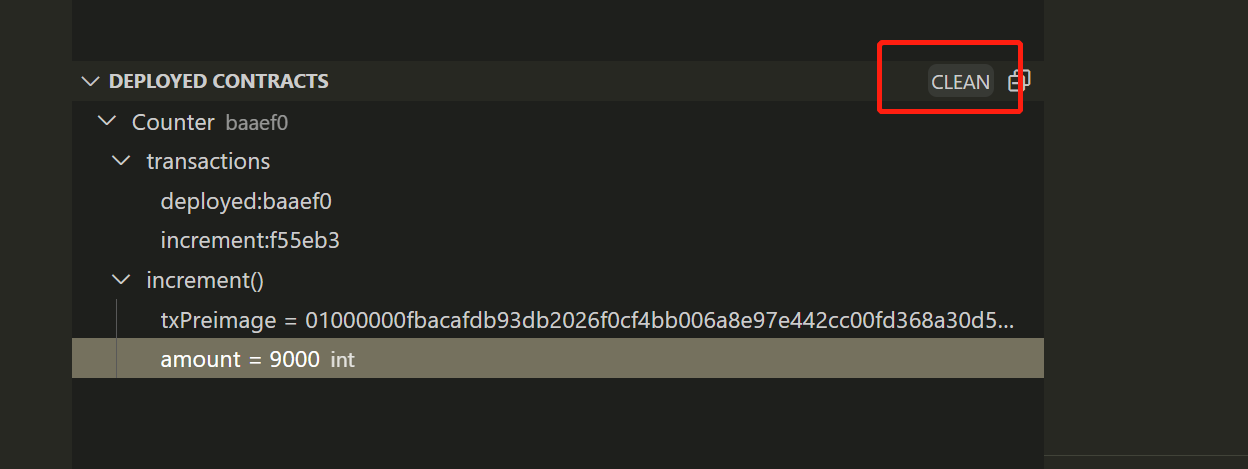
Clear All Contract Instances
Click this button to delete all contract instances.
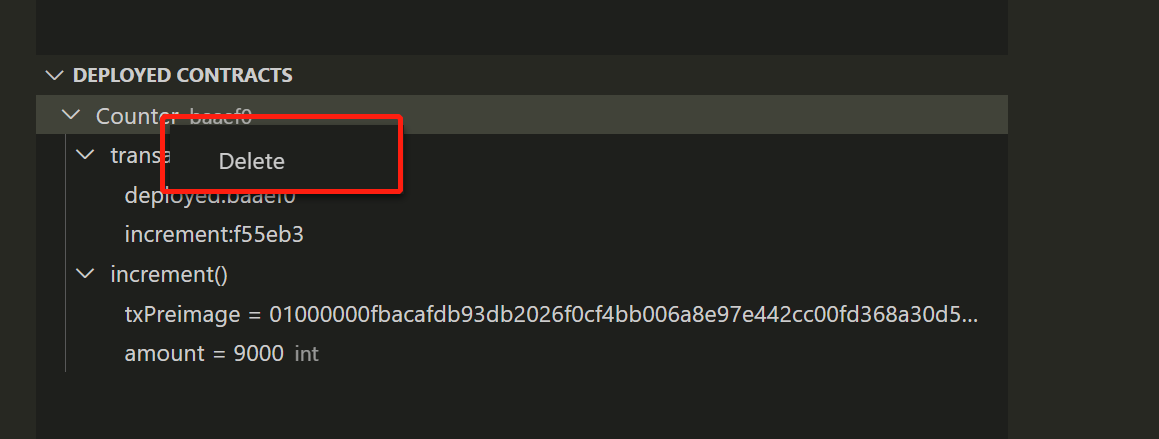
Delete a Single Contract Instance
Right-click on the contract instance and the Delete menu will appear. Click this menu to delete the contract instance.